Arduino Led Blink Breadboard : Simple Blinking LED - Arduino Project Hub : You will notice that both the.. By prince · published 01/30/2014 · updated 03/29/2014. This tutorial teaches you to control led using arduino uno or genuino uno. Led blinking with arduino uno r3,how to use digital pins of arduino uno r3 as an input or output. This project will test your arduino by blinking an led that is connected directly to the board. Blink question with breadboard & led.
To start, we will work on blinking an led, the 1 × breadboard. Turn leds on/off, toggle them, make them blink or even run custom patterns! This way i easily keep together my projects and easily store and carry it around. This led is connected to a digital pin and its number may vary from board type to board type. Knowing how a breadboard works.
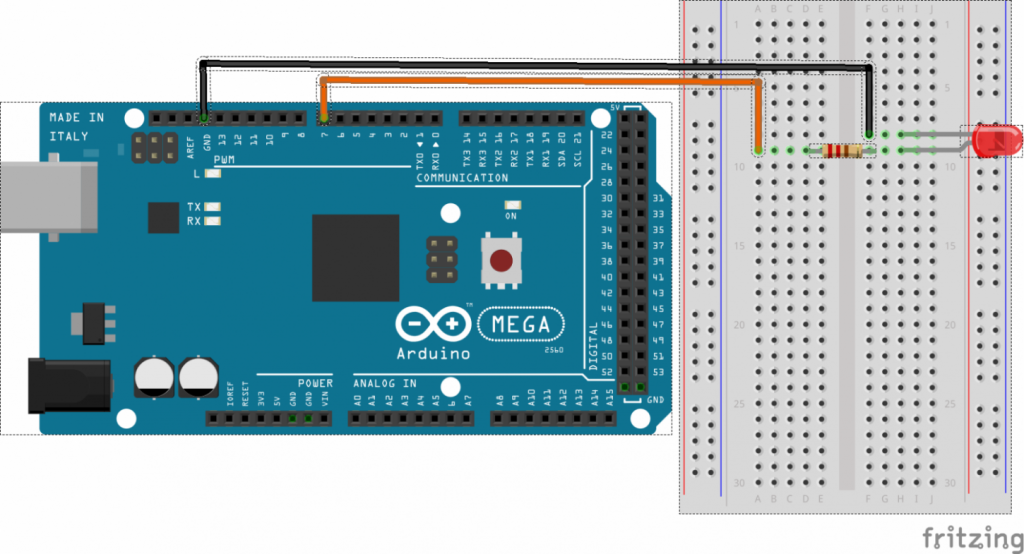
Arduino Mega - Blinking a LED - Geekering from www.geekering.com To get this led flashing, upload the blink program to your arduino: Now load the 'blink' example sketch from lesson 1. Blink question with breadboard & led. Simple library for arduino that offers control over leds without the use of delay functions. To start, we will work on blinking an led, the 1 × breadboard. In the diagram below we show an uno board that has d13 as the led_builtin value. Knowing how a breadboard works. Arduino uno is the best development board for beginners as we can program arduino board with less technical knowledge and programming skills.
Now load the 'blink' example sketch from lesson 1.
Hi and welcome to the first official post of princetronics.com! In the next section we will take a look an what is going on in that code we loaded. This led is connected to a digital pin and its number may vary from board type to board type. If your board has more than one led, blinking lights indicate that it is connected to a power source a breadboard is a solderless prototyping board used for making temporary electronic circuits, mainly for experimenting with different circuit board designs. The led blinking circuits can be used for various applications like giving visual signals for indications on the highways. Simple library for arduino that offers control over leds without the use of delay functions. Arduino uno board, connecting pins, 220ω resistor, led, breadboard. Move the red jumper wire from the arduino 5v connector to d13, as shown below: A quick demonstration of how to make an led blink using an arduino uno and a breadboard. Arduino ide comes with a lot of examples, which makes our task simpler. In arduino uno, a led will be already designed at the pin13, but we are not going to use it. The circuit for a blinking led on breadboard. As you can see in that example, in.
The led blinking circuits can be used for various applications like giving visual signals for indications on the highways. Once you have these components in hand. In the next section we will take a look an what is going on in that code we loaded. You will notice that both the. An integer can be several techniques in demultiplexing were explored here, specifically with respect to blinking leds.
LED-Arduino-circuit | Technology Tutorials from toptechboy.com #2 · blinking led on breadboard. An integer can be several techniques in demultiplexing were explored here, specifically with respect to blinking leds. Arduino ide comes with a lot of examples, which makes our task simpler. Blink question with breadboard & led. Led blinking with arduino uno r3,how to use digital pins of arduino uno r3 as an input or output. The 'hello world!' of arduino, it's the blinking led!if you asked neigh any arduino user what the first program they wrote was [for first, connect pin 7 on your arduino to a spot on your breadboard, then your resistor. On the other side of the resistor, insert your led. An led has very little resistance.
Here we are going to write a program to blink an led for every 500ms.
Arduino ide comes with a lot of examples, which makes our task simpler. An led has very little resistance. This tutorial teaches you to control led using arduino uno or genuino uno. On the other side of the resistor, insert your led. The blink program we loaded previously blinks the led on the breadboard. Turn leds on/off, toggle them, make them blink or even run custom patterns! With a simple modification of the breadboard, we could attach the led to an output pin of the arduino. In this led blink tutorial,we will use an arduino board with an external led. In this arduino for beginners tutorial i teach you about the breadboard, led, resistors and how to make a led on a breadboard blink. You need an arduino board, an led, a resistor and a breadboard. In the diagram below we show an uno board that has d13 as the led_builtin value. Now lets begin playing with our led adventure. Solderless breadboards are an important tool in your quest for electronics mastery.
In the next section we will take a look an what is going on in that code we loaded. The led blinking circuits can be used for various applications like giving visual signals for indications on the highways. On the other side of the resistor, insert your led. How to use proteus to learn arduino uno r3. How can i use alot of leds using a breadboard and considering them as one big led connect it with.
Arduino LED Blink Explaining Program - YouTube from i.ytimg.com In the next section we will take a look an what is going on in that code we loaded. With a simple modification of the breadboard, we could attach the led to an output pin of the arduino. Arduino uno board, connecting pins, 220ω resistor, led, breadboard. The circuit for a blinking led on breadboard. As you can see in that example, in. This way i easily keep together my projects and easily store and carry it around. Connect the short leg of the led (the negative leg, called the cathode) to the gnd. In this arduino for beginners tutorial i teach you about the breadboard, led, resistors and how to make a led on a breadboard.
Suppose you use a red 2.2v led with the 3v of your arduino, then the led breaks.
The s4a (scratch for arduino) code we shall use here is exactly the same as in the previous blink project. Why do we place a resistor in front of an led? Firstly we can start by blinking this on board led. Processing does send messages to arduino (which is why you see the rx led turn on), but there's nothing in the arduino code that initialises serial communication. As you can see in that example, in. Led blinking with arduino uno r3,how to use digital pins of arduino uno r3 as an input or output. Arduino ide comes with a lot of examples, which makes our task simpler. Solderless breadboards are an important tool in your quest for electronics mastery. Change around your wiring so that it matches this schematic Now load the 'blink' example sketch from lesson 1. The blink program we loaded previously blinks the led on the breadboard. Connect the short leg of the led (the negative leg, called the cathode) to the gnd. This led is connected to a digital pin and its number may vary from board type to board type.


Belum ada Komentar untuk "Arduino Led Blink Breadboard : Simple Blinking LED - Arduino Project Hub : You will notice that both the."
Posting Komentar